Your First Line of Defense Against Basement Flooding
When you install basement sump pump systems correctly, you create a powerful barrier against water damage, saving your home from costly flooding, mold, and structural issues.
Quick Overview: Installing a Basement Sump Pump
- Choose your pump type: Submersible or Pedestal.
- Locate the lowest point in your basement.
- Dig a sump pit to house the basin.
- Install the basin and pump with a gravel base.
- Connect discharge piping with a check valve.
- Route water outside, at least 10 feet from the foundation.
- Test the system by filling the pit with water.
A sump pump collects water in a pit and automatically pumps it away when levels rise. It’s a safety net against heavy rains, snowmelt, or rising groundwater. Without one, water can flood your living space, leading to mold, ruined belongings, and cracked foundations.
If you live in an area with heavy rain, a high water table, or poor yard drainage, a sump pump is essential. Installing one is a feasible project for experienced DIYers comfortable with plumbing, electrical work, and breaking concrete. However, many homeowners prefer professional installation. Mistakes in placement, piping, or electrical connections can lead to system failure or safety hazards.
My name is Jesse Delgado, and as a licensed plumber for over a decade, I’ve helped countless East Bay Area homeowners protect their properties from water damage. I’ve seen how a properly installed sump pump prevents the heartbreak of a flooded basement.

Learn more about effective flood prevention strategies for your home
Easy install basement sump pump word list:
Gearing Up: Choosing Your Pump and Gathering Supplies
Before you install basement sump pump systems, you need to choose the right equipment and gather your supplies. Proper preparation is key to a smooth installation.

Safety is paramount. You’ll be working with water, electricity, and breaking concrete. Always use safety glasses, heavy-duty work gloves, hearing protection (with a jackhammer), and a dust mask. Crucially, your pump must plug into a GFCI (Ground Fault Circuit Interrupter) outlet to prevent electrical shock.
Key Factors Before You Install a Basement Sump Pump
Choosing the right pump is critical. Consider these factors:
- Pump Type: Submersible pumps sit inside the pit, making them quiet and ideal for finished basements. They handle small debris well. Pedestal pumps have a motor above the pit, making them louder but cheaper and easier to service, suiting unfinished basements.
- Horsepower (HP): A 1/3 HP pump is sufficient for most homes with typical rainfall. If you face heavy rain or have a high water table, a 1/2 HP pump provides extra power. The pump’s discharge rate, measured in gallons per minute (GPM), indicates how quickly it moves water.
| Feature | Submersible Sump Pump | Pedestal Sump Pump |
|---|---|---|
| Noise Level | Very quiet, motor is submerged | Louder, motor is above the water |
| Lifespan | Often 10-12 years with good maintenance | Similar, but motor is exposed to air |
| Ideal Use | Finished basements, frequent use, high water flow | Unfinished basements, occasional use, tighter budgets |
The Importance of a Backup System
A major storm can knock out power, disabling your primary pump when you need it most. A battery backup sump pump is essential for true protection. It automatically takes over during a power failure, continuing to pump water away from your foundation. These systems include a secondary pump, a battery, and a charger. The battery typically needs replacement every 2-3 years.
Discover more about the essential role of battery backup sump pumps
Tools & Materials Checklist
Gather these items before you begin:
- Materials: Sump pump kit (pump, basin, cover), 1-1/2-inch PVC pipes and fittings, check valve, gravel, concrete mix, exterior-grade caulk.
- Tools: Shovel, pickaxe, electric jackhammer (rentable), drill with hole saw, level, tape measure, safety gear (glasses, gloves, etc.), 5-gallon buckets.
- Optional: Paving stone or pump stand to lift the pump off the pit floor.
Your Step-by-Step Guide to Install a Basement Sump Pump
With your gear ready, it’s time to install the pump. This guide breaks down the process into manageable steps.
Step 1: Find the Optimal Location
Your sump pump belongs in the lowest spot in your basement where water naturally collects. The location should be near an exterior wall for easier discharge pipe routing and close to a dedicated GFCI outlet. Crucially, keep the pit at least 10 inches away from foundation walls to avoid disturbing the footing.
Step 2: Create the Sump Pit
This is the most physically demanding step.

- Mark the Area: Place the basin on the floor and trace its outline, adding 4-6 inches around the perimeter for gravel backfill.
- Break the Concrete: Using an electric jackhammer and wearing full safety gear (glasses, gloves, dust mask, hearing protection), break up the concrete within your marked area.
- Excavate: Dig the hole deep enough so the top of the basin will be flush with the basement floor after adding a 6-inch gravel base.
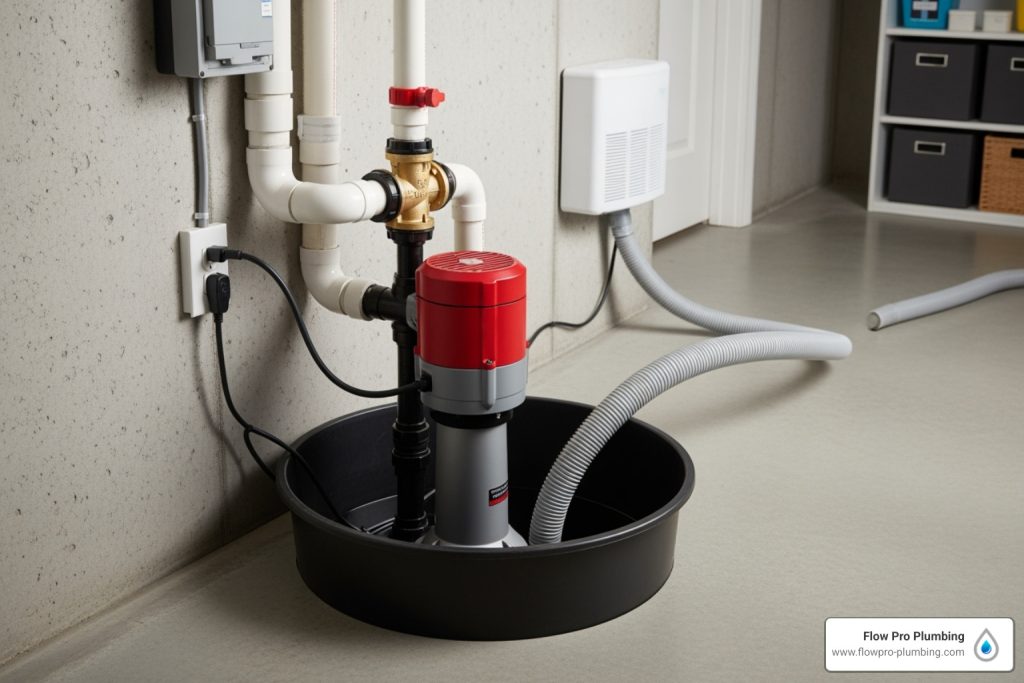
Step 3: Set the Basin and Pump
- Add Gravel Base: Pour a 6-inch layer of coarse gravel into the bottom of the pit and level it.
- Set the Basin: Lower the basin into the pit, ensuring its top edge is flush with the concrete floor. Use a level to check.
- Backfill: Fill the gap around the basin with more gravel to just below the level of the concrete slab.
- Position the Pump: Place the pump inside the basin, ideally on a paver or stand to keep it out of sediment. Ensure the float switch can move freely without touching the basin walls.
Step 4: Assemble the Discharge Line
This line carries water out of your home.

- Attach PVC Pipe: Connect a 1-1/2-inch PVC pipe to the pump’s discharge outlet. Dry-fit all pieces before using PVC cement.
- Install Check Valve: A few inches above the pump, install a check valve. This one-way valve prevents water from flowing back into the pit after the pump shuts off. Ensure the arrow on the valve points in the direction of water flow (up and out).
- Route the Pipe: Run the PVC pipe toward the chosen exit point on the exterior wall, using as few turns as possible.
Step 5: Route the Discharge Pipe Outside
- Drill Exit Hole: Use a drill with a hole saw to create an exit hole through the rim joist (the wooden board at the top of your foundation).
- Extend and Slope Pipe: Push the pipe through the hole to the outside. The pipe must have a continuous downward slope away from the house to ensure proper drainage.
- Discharge Point: The pipe must terminate at least 10 feet away from your foundation, ideally on ground that slopes away from the house. Never discharge into a municipal sewer line.
- Seal the Hole: Use exterior-grade caulk to seal the gap around the pipe where it exits the house.
Step 6: Final Connections and Finishing
- Patch Concrete: Mix and apply concrete to fill the gap around the basin, smoothing it level with the floor. Let it cure for at least 24 hours.
- Install Cover: Secure the cover on the sump basin. This prevents debris from falling in, reduces humidity, and is a critical safety measure.
- Plug In: Plug the pump’s cord into a dedicated GFCI outlet. Avoid using extension cords, as they can cause voltage drops and create a safety hazard.
Keeping It Running: Maintenance and Troubleshooting
Once you install basement sump pump systems, regular maintenance is key to ensuring they work when needed. A little care goes a long way in preventing catastrophic failure.
Testing After You Install a Basement Sump Pump
Before finishing, you must test your installation. Slowly pour a few buckets of water into the pit until the float switch activates the pump. Watch to ensure it runs smoothly and shuts off correctly once the water level drops. Check all pipe connections for leaks and verify that water is discharging properly outside, at least 10 feet from your foundation.
Routine Sump Pump Maintenance
Perform these checks to keep your pump in top condition:
- Quarterly Test: Pour water into the pit every few months to ensure the pump activates. This keeps parts lubricated and confirms functionality.
- Annual Cleaning: Once a year, disconnect the power and remove the pump. Clean the pump and the pit of any silt, gravel, or debris.
- Inspect Discharge Line: Regularly check that the discharge pipe outlet outside is clear of debris, snow, or ice. A blocked pipe can cause the pump to fail.
- Check the Valve: Ensure the check valve is operating correctly and not stuck.
For comprehensive tips on maintaining your sump pump, consult FEMA’s guidelines
Signs Your Sump Pump is Failing
Be alert for these warning signs that your pump may need repair or replacement:
- Strange Noises: Grinding, rattling, or gurgling can indicate a damaged motor or a clogged impeller.
- Excessive Vibration: While some vibration is normal, violent shaking can mean a damaged impeller or motor.
- Runs Constantly: If the pump never shuts off, you may have a stuck float switch or a failed check valve allowing water to flow back in.
- Visible Rust: Significant corrosion can compromise the pump’s housing and lead to failure.
- Fails to Activate: If the pump doesn’t turn on during a storm or when you test it, it needs immediate attention.
Catching these issues early allows you to address them before an emergency occurs.
Need to know more about sump pump battery replacement or other issues?
Frequently Asked Questions about Sump Pump Installation
Homeowners often have questions when they decide to install basement sump pump systems. Here are answers to some of the most common ones.
When should I call a professional instead of attempting a DIY installation?
While a DIY installation is possible, you should call a professional if you encounter:
- Complex Installations: Unusual drainage patterns or the need for extensive concrete demolition.
- Finished Basements: To avoid damaging existing walls, flooring, and finishes.
- Lack of Experience: If you are uncomfortable with plumbing or electrical work, professional installation ensures safety and proper function.
- Code Compliance: Professionals are knowledgeable about local building codes for drainage and electrical systems, ensuring your installation is compliant.
- Time and Tools: A pro can complete the job efficiently without you needing to rent specialized tools or spend a weekend on heavy labor.
How long does a sump pump typically last?
With proper maintenance, a quality sump pump should last 7 to 10 years. Factors like how often it runs, water quality, and the quality of the pump itself will affect its lifespan. A pump in an area with a high water table that runs frequently will wear out faster. Proactively replacing your pump around the 7-year mark is a wise strategy to avoid failure during a storm.
Why does my house need a sump pump?
A sump pump is a crucial defense for your home for several reasons:
- High Water Table: In areas like Contra Costa County, groundwater can exert pressure on your foundation, leading to seepage. A sump pump actively removes this water.
- Heavy Rainfall or Poor Drainage: If your yard slopes toward your house or water pools near the foundation, a sump pump is needed to manage water that gets into the basement.
- History of Moisture: If you’ve had dampness, musty smells, or standing water in your basement before, a sump pump is the solution.
- Foundation Protection: By keeping the area dry, a sump pump prevents water from weakening concrete and causing costly structural damage.
- Health and Air Quality: A dry basement prevents the growth of mold and mildew, protecting your family’s health.
Explore more reasons why a house might need a sump pump
Protect Your Home with a Properly Installed Sump Pump
Understanding how to install basement sump pump systems is the first step toward protecting your home. A properly functioning pump is more than just a piece of equipment; it’s peace of mind. It guards your foundation against water damage, protects your belongings from flooding, and prevents unhealthy mold growth.
The financial benefit is clear: a sump pump is an affordable insurance policy against water damage repairs that can run into the thousands.
While this can be a rewarding DIY project for those with the right skills, there is no substitute for professional expertise when it comes to complex plumbing and electrical work. A mistake during installation can lead to catastrophic failure when you need protection the most.
In Brentwood, CA, and throughout Contra Costa County, our team at Flow Pro Plumbing has the experience to ensure your sump pump is installed correctly and efficiently. We understand local conditions and building codes, and we pride ourselves on our unsurpassed workmanship and friendly service.
Whether you need a new installation, a battery backup system, or maintenance on your current pump, we are here to help. Don’t wait for the next storm to test your basement’s defenses.