Why Every Homeowner Should Know How to Repair a Leaky Sink
You should repair leaky sink issues quickly to prevent water damage, higher utility bills, and structural problems. A typical home can lose 2,000 to 20,000 gallons of water annually from plumbing leaks, with sink leaks being a primary cause.
Quick repair steps for most sink leaks:
- Turn off water supply – Shut off valves under the sink.
- Identify the leak source – Check the P-trap, supply lines, and faucet connections.
- Tighten loose connections – Use slip-joint pliers to snug up coupling nuts.
- Replace worn washers/gaskets – Take old parts to a hardware store for matching replacements.
- Test the repair – Run water and check for drips with paper towels.
A puddle in your kitchen cabinet is more than an annoyance; it’s a sign of a problem needing immediate attention. The longer a leak goes untreated, the more expensive the repair becomes. A few drips can escalate into water damage affecting cabinets, flooring, and your home’s structural integrity. These damp conditions also invite mold and mildew, creating health risks.
The good news is that most sink leaks are fixable with basic tools. Whether it’s a loose P-trap, worn-out washer, or failing drain seal, these repairs are within reach for most homeowners.
I’m Jesse Delgado, owner of Flow Pro Plumbing. With over a decade of experience helping East Bay homeowners repair leaky sink problems, I’ve learned that understanding the problem is the key to the right solution. This guide will walk you through common sink leak repairs step-by-step.

First Steps: Identifying the Source and Dangers of a Sink Leak
Before you can repair leaky sink problems, you must find the exact source. A leak isn’t always an obvious puddle. Look for subtle clues like water stains (light yellow or dark brown discoloration) on the cabinet floor or a persistent musty odor, which indicates mold or mildew. A rhythmic dripping sound when the sink is off is another clear sign.
To pinpoint the source, use the paper towel test. First, clear and dry the entire area under the sink. Line the cabinet bottom with dry paper towels, wrapping them around all pipes and connections. Turn on the faucet for several minutes, then check where the paper first becomes damp. For slow leaks, you may need to leave the paper towels for a few hours. Fill the sink and then drain it to determine if the leak is from the drain lines (leaks when draining) or supply lines (leaks when water is running).
Never ignore even a small leak. I’ve seen minor drips lead to thousands of dollars in damage. Constant moisture rots the wood in cabinets and flooring and can compromise wall studs, leading to major structural repairs.
Mold and mildew can present health risks, especially for those with respiratory issues, and they thrive in the dark, damp space under a leaking sink. A leaky faucet can also waste up to 100 gallons of water daily, significantly increasing your utility bills.

Common Causes of Under-Sink Leaks
Understanding common failure points helps you find the problem faster. Since water flows downward, the source is usually above the puddle.
- Drain line leaks: The U-shaped P-trap is a frequent culprit. Its slip-joint nuts can loosen over time, or the internal washers can wear out.
- Water supply line leaks: These occur where hot and cold lines connect to shut-off valves or the faucet. Loose fittings and damaged O-rings are common issues, often worsened by high water pressure.
- Faucet base leaks: Water pooling on the countertop around the faucet base points to a worn internal seal or deteriorated plumber’s putty.
- Worn-out gaskets: These small rubber or nylon parts create watertight seals. Over time, they harden, crack, and fail.
- Loose connections: Vibrations from water flow and temperature changes can gradually loosen nuts and fittings.
- Deteriorated plumber’s putty: The putty or caulk around the sink drain or faucet base can dry out and crack, allowing water to seep through.
- Cracked pipes: While less common with modern PVC, older metal pipes can corrode and develop cracks that require replacement.
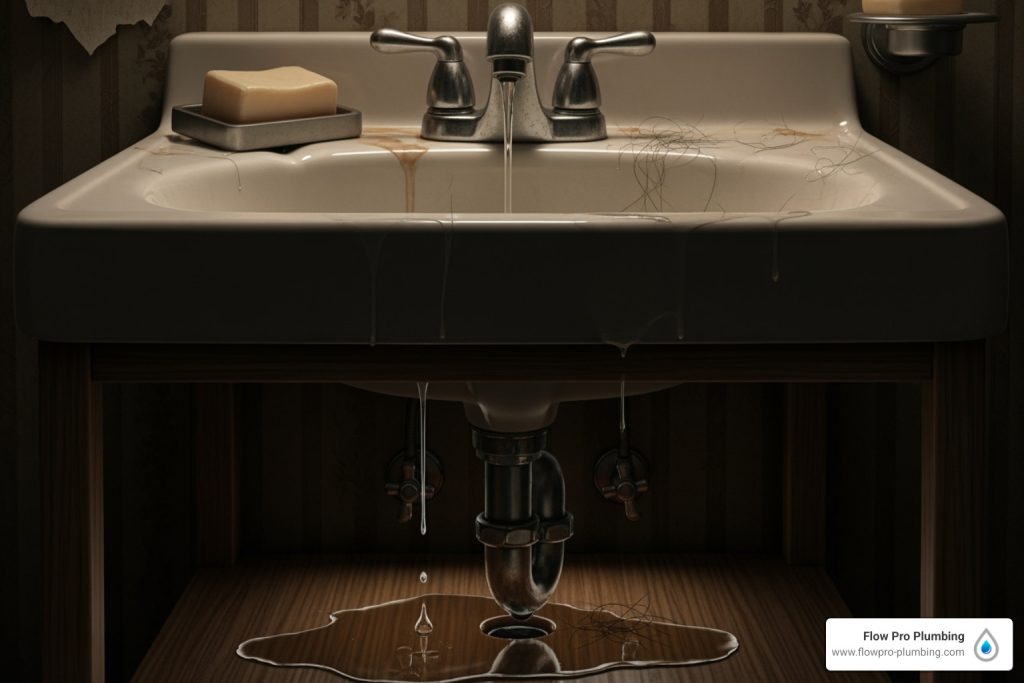
How to Repair a Leaky Sink Drain (The P-Trap and Connections)
The U-shaped pipe under your sink is the P-trap. It holds water to block sewer gases and is a common source of leaks due to its multiple connection points. Fortunately, most P-trap issues are straightforward to fix.
Before you start, always shut off your water supply using the small valves under the sink (turn them clockwise). If there are no valves, you must use your home’s main water shut-off. Place a bucket under the P-trap to catch water and keep rags handy for cleanup.

Tools and Materials You’ll Need
Having the right tools makes any repair leaky sink project easier. Gather these items before you begin:
- Essential tools: A bucket, rags, adjustable slip-joint pliers, and tongue-and-groove pliers for gripping coupling nuts without stripping them.
- Replacement parts: You may need a complete P-trap kit (modern PVC kits are best), but often just replacement washers are required. Take the old ones to a hardware store to find an exact match.
- Sealant: Pipe sealant or plumber’s tape can be used on threaded connections, but it’s often unnecessary with new washers.
Step 1: Tightening Loose Connections to repair a leaky sink
Many leaks are caused by connections that have loosened over time. Before disassembling anything, try this simple fix.
After identifying the drip’s origin, try hand-tightening the coupling nuts first by turning them clockwise. This alone can often stop a leak. If that doesn’t work, use your tongue-and-groove pliers to give the nut a gentle quarter-turn. For plastic PVC traps, a quarter-turn after hand-tightening is usually enough. Metal traps can handle up to a half-turn.
Crucially, do not over-tighten. This is a common mistake that can crack plastic pipes or strip threads, turning a simple fix into a bigger problem. Snug is good; excessively tight is not. Test the connection by turning the water back on and checking for drips.
Step 2: Disassembling and Replacing the P-Trap
If tightening didn’t work or you see visible damage like cracks, it’s time to replace parts.
With your bucket in place, loosen the coupling nuts at both ends of the P-trap by turning them counter-clockwise. Some stagnant water will drain out. Wiggle the U-shaped section free and inspect it for cracks or corrosion.
Next, examine the washers inside each coupling nut. These rubber or nylon rings create the seal. If they are hardened, cracked, or flattened, they are the likely cause of the leak. Take your old P-trap and washers to the hardware store to ensure you buy the correct replacements.
When installing the new parts, clean any debris from the pipe ends. Ensure proper alignment so pipes slide together smoothly and washers are seated correctly. Hand-tighten the nuts first to avoid cross-threading, then use pliers for a final quarter-turn. Turn the water back on and test your work thoroughly. A successful repair leaky sink project will leave you with a quiet, drip-free drain.
Fixing Leaks from the Sink Drain and Faucet
Leaks can also come from the sink drain flange (where the drain meets the sink basin) or the faucet itself. These repairs require different methods but are just as manageable.

Sealing the Sink Drain Flange
The metal ring at the bottom of your sink is the drain flange. If its seal fails, water will drip into the cabinet from around the drain basket assembly. To repair leaky sink drain flanges, you must choose the right sealant.
- Plumber’s Putty:
- Pros: Easy to mold by hand, non-adhesive for repositioning, simple cleanup.
- Cons: Can dry out and crack over time, not recommended for some plastic drains as it can cause degradation.
- Silicone Sealant:
- Pros: Creates a strong, permanent, flexible, and waterproof seal. It’s also resistant to mold and mildew.
- Cons: Messier to apply, requires curing time (2-24 hours), and is difficult to remove once cured.
For kitchen sinks, I recommend 100% silicone for a durable, long-lasting repair.
To start, turn off the water supply and place a bucket under the drain. Disassemble the drain by loosening the large nut holding the drain basket assembly in place from underneath. Thoroughly clean all old putty and debris from the sink opening and the flange itself. A utility knife can help scrape away stubborn material.
If using silicone, apply a continuous bead to the underside of the drain flange. Press it firmly into the sink opening, reinstall the basket assembly from below, and tighten the nut. Wipe away any excess silicone immediately with a damp cloth. If using plumber’s putty, roll it into a rope, apply it to the flange, and install. Putty requires no cure time.
How to repair a leaky sink by Replacing a Faucet Cartridge
A dripping faucet can waste up to 100 gallons of water a day. Most modern faucet leaks, whether from the spout or handle base, are caused by a worn internal cartridge (or a washer/O-ring in older faucets).
First, shut off the hot and cold water supply under the sink. Turn the faucet on to drain any remaining water.
To remove the faucet handle, look for a small set screw, often hidden under a decorative cap. Pop the cap off and use an Allen wrench or screwdriver to loosen the screw, then lift the handle off. For two-handle faucets, the screw is usually under a cap on top of the handle.
With the handle off, you may need to remove a decorative cover to access the cartridge. A retaining nut or clip holds the cartridge in place; remove it with pliers or a screwdriver. Pull the old cartridge straight out of the faucet body, using pliers to gently wiggle it if it’s stuck.
Take the old cartridge to the hardware store to find an exact match, as they are not universal. Before installing the new one, clean any mineral deposits from inside the faucet body. Insert the new cartridge, ensuring any alignment tabs line up correctly.
Reassemble the faucet in reverse order: secure the retaining nut/clip, replace the cover, and reattach the handle. Turn the water supply back on slowly and check for leaks.
For more detailed troubleshooting, see our guide on how to stop a faucet from dripping.
When to Call a Professional Plumber
There’s satisfaction in a successful DIY repair, but knowing when to call a professional can save you time, money, and frustration. Sometimes, a simple-looking leak is a symptom of a larger problem.
Consider calling a pro if you encounter these issues:
- Persistent Leaks: If a leak returns after you’ve tried to fix it, there may be an underlying issue like a failing valve or a hidden crack.
- Cracked or Corroded Pipes: Repairing these requires specialized tools and expertise. A mistake can lead to a major flood.
- Multiple Leak Sources: If you have leaks in several locations, it could signal a systemic problem like high water pressure or widespread pipe aging.
- Low Water Pressure: This can be a sign of a hidden leak somewhere in your plumbing system that requires professional detection equipment.
- Significant Water Damage: If a leak has already damaged cabinets, floors, or walls, a plumber can assess the situation and recommend remediation steps beyond just fixing the pipe.
- Lack of Confidence or Time: If you’re not comfortable with the repair or simply don’t have the time, there’s no shame in calling for help.

The benefits of hiring a professional go beyond a simple fix. At Flow Pro Plumbing, our team brings expertise and experience from thousands of service calls. We use proper tools and carry quality parts to handle most repairs in a single visit. Most importantly, we provide guaranteed workmanship and can offer preventative advice to help you avoid future issues.
Whether you’re in Brentwood, Antioch, Oakley, or anywhere in Contra Costa County, our team is ready to restore your peace of mind. Learn more about professional Kitchen Sink Repair services and how we can help.
Frequently Asked Questions about Sink Leaks
Here are answers to the most common questions homeowners have when they need to repair leaky sink problems.
How can I tell if my sink repair was successful?
A successful repair means no more drips. To be sure, you must test it thoroughly. After reassembling the parts, turn the water supply back on. Run both hot and cold water at full pressure. Then, fill the sink basin completely and pull the stopper to let it all drain out, which tests the drain seals under pressure. Place dry paper towels under the repair area and check them after an hour, and again the next day. Any moisture indicates the leak is not fully resolved.
What are the most common causes of a leak under the sink?
The most frequent culprits are:
- Loose slip-joint nuts on the P-trap and drain lines.
- Worn-out rubber washers or gaskets inside those connections.
- A failed seal around the sink drain flange where it meets the sink basin.
- A worn-out cartridge or O-ring inside the faucet itself, causing drips from the spout.
How serious is a small leak under the sink?
Every leak, no matter how small, is serious. A tiny drip wastes a surprising amount of water, increasing your utility bills. More importantly, the constant moisture creates a perfect breeding ground for mold and mildew, which can cause health issues. This moisture also leads to wood rot in your cabinets and subfloor, potentially compromising your home’s structural integrity. What starts as a minor drip can lead to thousands of dollars in damage, so it’s crucial to address it immediately.
Don’t Delay, Fix That Drip Today
An annoying drip under your sink is a call to action. This guide has shown you how to repair leaky sink issues by identifying the source, tightening loose connections, replacing worn parts, and testing your work. Most of these fixes are simple and well within reach for a homeowner with basic tools.
However, ignoring leaks leads to bigger problems. A small drip can cause thousands of dollars in water damage, promote unhealthy mold growth, and waste a shocking amount of water.
Tackle straightforward repairs with confidence, but know your limits. For complex jobs or if you’re unsure, calling a professional ensures the repair is done right the first time. There’s no shame in getting help for cracked pipes, persistent leaks, or problems you’re not comfortable fixing.
Professional help ensures the job is done right with the expertise and guaranteed workmanship that comes from experience. At Flow Pro Plumbing, we pride ourselves on friendly service and quality work throughout Contra Costa County, including Brentwood, Oakley, and Antioch.
Don’t let a drip turn into a disaster! For expert plumbing services in Antioch and surrounding areas, contact us today!