Revitalize Your Kitchen: Installing a New Sink
Want to install new sink yourself? It’s a project many homeowners can tackle. Here are the basic steps:
- Turn off your home’s water supply.
- Disconnect and remove the old sink and its parts.
- Install the new faucet and drain assembly onto the new sink.
- Carefully set the new sink into the countertop opening.
- Connect the new water supply lines and drain pipes.
- Turn water back on and check for any leaks.
A new sink can really jazz up your kitchen. It brings a fresh look and better function. While it takes some careful work, doing it yourself can be very rewarding. Most folks find it a moderate-level DIY task. It usually takes a few hours to complete. This guide will walk you through each step, making sure you get it right.
I’m Jesse Delgado, owner of Flow Pro Plumbing. My background includes years of hands-on plumbing experience, particularly with residential service, ensuring quality for every install new sink project. I’ve also spent years helping our team master efficient, reliable plumbing solutions.

Before You Begin: Choosing Your Sink & Gathering Supplies
Before installation, let’s choose the perfect sink and gather all necessary tools and materials. A little preparation now saves a lot of headaches later. Upgrading your sink is a big deal for your kitchen, so choosing wisely and getting organized will pay off. For inspiration, check out our gallery of beautiful Faucets & Sinks.
Choosing the Right Kitchen Sink
The first step is picking the right sink for your home and lifestyle. Kitchen sinks vary in installation ease, countertop requirements, and the materials they are made from.
| Sink Type | Installation Ease | Countertop Requirements | Common Materials |
|---|---|---|---|
| Drop-in | Easiest | Any (rests on top) | Stainless steel, cast iron, composite |
| Undermount | Moderate | Solid surface (granite, quartz) for support | Stainless steel, cast iron, composite |
| Farmhouse | Advanced | Custom cabinetry, specific countertop cutout | Fireclay, cast iron, stainless steel |
Let’s review these choices. Drop-in sinks (or top-mount) are a favorite for DIYers because they are the easiest to install new sink yourself. They simply drop into a countertop opening and are supported by their rim.
Undermount sinks attach to the underside of the countertop for a seamless look that makes cleanup easy. They typically require solid surface countertops like granite or quartz for support.
Farmhouse (or apron-front) sinks are statement pieces that bring a distinct vibe to your kitchen. Their installation is more involved, often requiring custom cabinetry and a specific countertop cutout.
Beyond the installation type, consider how you use your sink. Do you prefer a single-bowl sink for washing large pots, or would a double-bowl sink be better for multitasking? Double bowls come in various size configurations for flexibility.
Finally, consider the material. Stainless steel is durable, affordable, and easy to clean. Cast iron sinks offer a classic, heavy-duty feel with an enamel finish. For more color or texture, fireclay and composite granite sinks come in a wide range of options to match your kitchen’s style.
Essential Tools and Materials
Having all your tools and materials ready before you start is a game-changer. Here’s what you’ll need for a typical sink installation:
First, you’ll need your new kitchen sink and faucet. Double-check that the sink has the correct number of holes for your faucet. You’ll also need new water supply lines (check compatibility with your faucet and shut-off valves) and the drain assembly/strainer (check if it’s included with the sink).
For sealing, you’ll need plumber’s putty and a tube of silicone sealant to create a watertight seal between the sink and countertop.
For tools, gather an adjustable wrench, pipe wrench, pliers (or channel locks), Phillips and flathead screwdrivers, a utility knife for old caulk, and a putty knife for scraping. A tape measure, bucket, and towels are also essential. Always wear safety goggles.
Depending on your situation, you might also need a hacksaw or pipe cutter for drain pipes, or a jigsaw if you’re cutting a new countertop opening. For PVC drain pipes, you’ll need PVC primer and cement. For threaded water connections, Teflon tape helps ensure a tight seal.
Measuring and Preparing the Countertop
Accurate measurements are key when preparing your countertop. If you’re replacing a sink with one of the same size, your job is simpler. However, if you’re changing the sink’s size or installing a new countertop, precise measurements are crucial.
Carefully measure the existing sink cutout. If your new sink is larger, you may need to expand the opening. Always check your cabinet base width underneath to determine the maximum sink size your cabinet can accommodate.
Most new sinks come with a template to help you mark cut lines on the countertop. Always measure twice, cut once! When making a new cut, drill pilot holes in the corners of your marked lines. Use a spade bit slightly wider than your jigsaw blade. As you cut with the jigsaw, support the cutout piece from below to prevent it from falling and binding the blade.
Once the old sink is out and any cutting is done, thoroughly clean the work area. Scrape away all old plumber’s putty, caulk, and grime from the countertop. A clean surface is essential for a proper, watertight seal for your new sink.
Out with the Old: Removing Your Existing Sink
Now it’s time to remove the old sink. This step is crucial to do correctly and safely to prepare for the new installation.

Safety first: Before you begin, turn off the water completely to prevent any leaks.
Disconnecting Water and Drain Lines
First, turn off the water supply to the sink using the hot and cold shut-off valves underneath. Turn the handles clockwise until snug. If you can’t find them or they’re stuck, turn off your home’s main water supply. Then, open the faucet to drain remaining water and release pressure.
Place a bucket and towels under the P-trap and supply lines to catch water. Use an adjustable wrench or pliers to disconnect the hot and cold water supply lines from the faucet.
For kitchens with a garbage disposal, turn off its power at the breaker box and unplug it if possible. Once powered down, disconnect its drain pipe and remove the unit.
Next, disconnect the P-trap, the U-shaped pipe connecting the sink drain to the wall drain. It may still hold some water. If you have a dishwasher, disconnect its drain hose from the disposal or sink drain. Tip: Take a photo of the current plumbing setup for reference during reassembly.
Releasing the Sink from the Countertop
With the plumbing disconnected, free the sink from the countertop. Get underneath and loosen or remove the mounting clips holding the sink in place.
Use a utility knife to carefully cut through the old sealant or caulk around the sink’s edge where it meets the countertop.
Once the clips are loose and sealant is cut, gently push up on the bottom of the old sink. It may be stubborn, so a little wiggling might be needed. Get help lifting a heavy sink. Carefully lift the old sink out and set it aside.
Finally, use a putty knife or scraper to thoroughly clean the countertop surface of any old caulk, putty, or grime. A clean surface is essential for a good seal when you install new sink.
Step-by-Step Guide to Install a New Sink
Now for the installation. We’ll focus on a drop-in sink, which is the most DIY-friendly. A key tip is to install the faucet and drain assembly on the sink before placing it in the countertop.

Installing the Faucet and Drain Strainer
First, install the new faucet, following the manufacturer’s instructions. Typically, you’ll feed the supply lines and hardware through the sink’s deck holes and secure it from underneath with nuts and washers. Ensure the faucet is correctly oriented before tightening.
Next, install the drain strainer. Apply a thin rope of plumber’s putty to the underside of the strainer’s lip. Press the strainer firmly into the sink’s drain opening. From below, attach the gasket, washer, and locknut to the strainer’s tailpiece, tightening securely with pliers. Wipe away any excess putty that squeezes out. For more general guidance on drain installation, you can check out resources like this detailed guide.
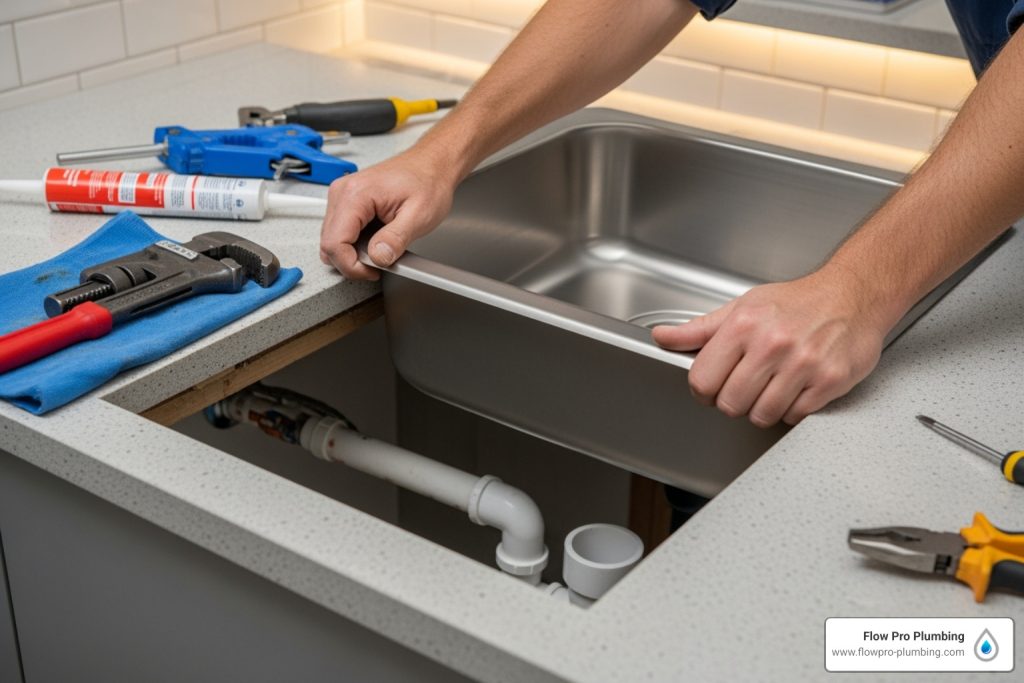
Setting the Sink and Connecting Water Supply
With the faucet and drain attached, apply a continuous bead of silicone sealant around the edge of the countertop opening. This is crucial for preventing leaks.
Carefully lower the new sink into the cutout, ensuring it’s aligned. Press down firmly to seat it in the sealant. From underneath, secure the sink with its mounting clips, tightening them evenly but not so much that you damage the sink or countertop. Some sinks may not require clips.
Finally, connect the water supply lines. Wrap Teflon tape clockwise around the faucet’s threaded tailpieces. Connect the supply lines from the faucet to the shut-off valves, tightening securely with an adjustable wrench. Be gentle with plastic fittings.
Connecting the Drain Pipes
Connecting the drain pipes can be like a puzzle. The goal is to connect the sink’s drain tailpiece to the wall drain using a P-trap.

Assemble your P-trap (the U-shaped pipe) and connect it to the sink’s drain tailpiece using slip nuts and washers. For most kitchen sinks, the standard tailpiece and waste line diameters are 1 1/2 inches. You may need to cut lengths of Schedule 40 PVC pipe to bridge the gap between your P-trap and the wall drain. A swivel P-trap with a trap adapter can offer more flexibility. When cutting PVC, clean the ends, apply PVC primer, then PVC cement, and hold the pieces together firmly for 30 seconds. For a visual guide, you can watch how to install a P-Trap.
If you have a garbage disposal, install it according to its manufacturer’s instructions. Ensure it’s properly mounted and connected to the electrical supply (only turn the power back on after all connections are secure). Then, connect the disposal’s discharge pipe to your P-trap assembly.
Lastly, connect the dishwasher drain hose to the port on your garbage disposal or sink drain tailpiece and secure it with a hose clamp.
The Final Checks: Preventing Leaks & Common Pitfalls
The final step after you install new sink is to ensure everything is leak-free. Attention to detail here prevents future problems. If you encounter issues, Flow Pro Plumbing can help with Kitchen Sink Repair.
How to Ensure a Watertight Seal and Check for Leaks
Before turning the water on, wipe away any excess silicone sealant from the sink’s rim for a clean finish.
Now, test for leaks. Slowly turn the water supply back on at the shut-off valves. A sudden rush of water can stress weak connections.
With the water on, use a flashlight to inspect every connection: faucet to supply lines, supply lines to shut-off valves, and all drain joints, including the P-trap.
Run the water for a few minutes, then fill and drain the sink to test the system under normal use. If you see small drips, a gentle quarter-turn on the connection will often fix it. Do not over-tighten.
Pro tip: Fill the sink and let it sit overnight. The water weight helps the silicone seal, and any slow leaks will be apparent by morning.
Common Mistakes to Avoid When You Install a New Sink
Even experienced DIYers can make mistakes when they install new sink. Here are common pitfalls to avoid.
Measurement mishaps are a frustrating mistake. Always measure twice (or three times) and use the template if your sink came with one to ensure it fits the opening.
Over-tightening plastic fittings is a common error. Plastic nuts can crack easily. The rule of thumb is hand-tight plus a quarter turn with a wrench.
Skipping the sealing materials is asking for trouble. Plumber’s putty and silicone sealant are essential for keeping your kitchen dry.
Poor surface preparation can cause a faulty seal. If you don’t completely clean old caulk and grime from the countertop, the new sealant won’t stick properly.
P-trap alignment issues can cause slow drainage or leaks. The P-trap must line up naturally. If it’s forced or crooked, adjust pipe lengths or use different fittings.
Rushing the leak test is a frequent mistake. Don’t just turn the water on for a second. Run water, fill the sink, and drain it to test the system thoroughly.
DIY vs. Pro: Cost & When to Call for Help
A DIY sink installation can be a rewarding experience. There’s great satisfaction in admiring a job you’ve done with your own hands. You’ll just need to get the materials and any new tools.
However, while the DIY route offers a sense of accomplishment, it’s important to know when to call a professional. A professional plumber can be the smartest move to ensure the job is done perfectly and safely. This is about making a wise decision for your home and peace of mind. Our blog, Do Plumbers Install Sinks?, dives deeper into this topic.
When to Hire a Professional Plumber
While a drop-in sink installation is a manageable DIY project, some situations require a professional’s expertise:
-
Moving Existing Plumbing Lines: If your project involves moving water supply or drain pipes, this is a complex job best left to a licensed plumber. It often requires opening walls and ensuring work meets local plumbing codes.
-
Cutting Stone or Solid Surface Countertops: Materials like granite or quartz require specialized tools and techniques to cut without causing expensive damage. Hire a professional fabricator or experienced plumber for this task.
-
Unforeseen Plumbing Issues: You might uncover issues like corroded pipes or stuck valves when removing the old sink. These can turn a DIY project into a headache. A professional can fix these problems correctly and save you stress.
-
If You Lack Confidence or Tools: If you’re not confident in your skills, lack the right tools, or want to avoid the hassle, call a pro. A professional plumber will ensure your install new sink project is done correctly and is leak-free, giving you peace of mind.
-
Complex Installations: Installations for undermount or farmhouse sinks are more challenging than drop-in sinks. They require precise measurements, custom support, and special techniques. Professional expertise is invaluable for these intricate projects.
Conclusion
Congratulations! You now know how to install new sink in your kitchen. You’ve learned to select a fixture, gather tools, remove the old sink, and install the new one.
We covered the essentials: installing the faucet and drain, connecting water and drain lines, and creating a watertight seal. You also learned how to avoid common pitfalls.
The satisfaction of a successful DIY project is special. You’ve refreshed your kitchen’s look and gained valuable skills. Enjoy the sense of accomplishment!
Before celebrating, double-check all your connections for leaks. Run water, fill and drain the sink, and watch for drips. If you find any, a gentle quarter-turn adjustment on the connection should fix it.
Now, we know that not every installation goes exactly according to plan. Sometimes you find corroded pipes, need to cut through stone countertops, or simply prefer the peace of mind that comes with professional expertise. For complex jobs, or if you simply want an expert hand ensuring everything’s perfect, Flow Pro Plumbing is here to help.
Our experienced, friendly team brings unsurpassed workmanship to every project, ensuring a perfect, leak-free installation every time. We’ve built our reputation on reliable service throughout Contra Costa County, proudly serving homeowners in communities like Brentwood, Oakley, Pittsburg, Concord, Walnut Creek, and many others. When you need that professional touch, Contact us for professional plumbing services in Antioch, CA and the surrounding areas.
Whether you tackled this project yourself or decide to bring in the pros for your next plumbing adventure, you now have the knowledge to make informed decisions about your kitchen upgrades. Here’s to many years of enjoying your beautiful new sink!